

Easy way to color match in Premiere Pro
Matching colors in premiere pro is quite a complex one for lots of people but this video will help you. Stay tuned!!!
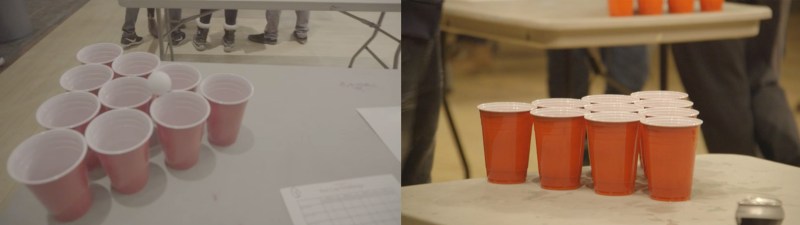
This is a project we have filmed earlier in 2018, and we filmed with a Sony A6300 on a gimbal and the Canon C100. Obviously, they have two different color profiles and we have to match both. There are two similar shots to help me find my baseline. Here is the Canon shot and here is the Sony one. Both were shot in the log but S-log is much more flat than C-log.
First, we will put the lumetri effect on both clips, I just search for it in the panel and slide the effect on two shots in the timeline. Sometimes what I do is to turn the image to a black and white image (you can do this by going to the lumetri panel, basic correction and turn the saturation down) which helps me focus on the contrast and exposure of both images without getting distracted.
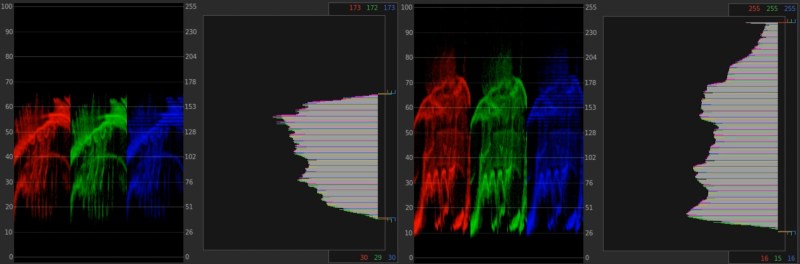
Once this is done, pull up your tools (lumetri scope and reference monitor is what I use). You can go between the two shots while using RGB parade and see the difference between the two. Here, the C-log shot is between 10-80 IRE, and the S-log shot is between 18-65 IRE which means there is a contrast difference between the two.
Since Sony S-log has more latitude, am trying to make that one make match the C-log shot –so we will increase the contrast of the S-log shot. If you go a little too dark on one shot it’s ok, try a couple settings and see how that works. Your eyes should be what you trust the most even if the tools are here to help you. Once you have found the right setting and it looks good, we can put the color back into it, hit reset or type 100 in the saturation slider.
Next we will bring the shots into the same color space overall. What I do is look where the difference is comparing the RGB parade, the Canon shot has more red.

So again looking at the reference monitor, adjust the shot overall will tell you the difference –trust your eye. If you are not sure, experiment and you will get better at it. The Sony image has lesser red so we will add the temperature first and see where it brings the image. Sometimes what I do is go to an extreme and pull it back until I’m getting closer. Bouncing between the two shots will give you an idea if we are getting closer, and we are!

Now we have another problem! The Sony S-log shots are leaning towards the purple side while the Canon shots have more shades of yellow and green. Next we go to HSL secondary –this is meant to target a specific color so select the color picker and select the color you want to target, it will give you a good base to start with. What I like to do is select the show mask, that way I am seeing exactly what I am selecting.

In this case, we can see that we are missing out on so much portion of the image so all we need to do is play with them until satisfaction. I usually add a little blur and a little denoise which helps in blending the color.

Looking at the color wheel, the colors on each side of red are purple and green but first we will push the needle towards green and see the effect then just pull back towards orange and we are getting to a similar tone. The Canon C-log is more saturated so we need to reintroduce saturation. Add this and voila we have a happy ending.
For today this is the end product.
